3 Free Vulnerability Management Projects for Cybersecurity Portfolios
Build three vulnerability management portfolio projects with OpenVAS Free and Metasploitable 2: analyze findings, prioritize risk, remediate and verify.
October 11, 2026
A vulnerability scan can produce dozens of findings in a few minutes. That is the easy part.
The harder work starts when someone has to decide what those findings mean. Is the vulnerability really present? How serious is it in this environment? Has it been exploited in the wild? What should be fixed first? And once a system owner says the issue is resolved, is there enough evidence to actually close it?
Those are vulnerability management questions.
In these three projects, you'll work through that process using OpenVAS Free and an intentionally vulnerable Metasploitable 2 system. You'll begin by running a scan and investigating one finding, then compare several vulnerabilities using technical and business context, and finish by choosing a vulnerability to remediate or mitigate and verifying the result.
A scan report is only the starting point. Your portfolio should show that you can interpret it, make a decision and verify what happened next.
Who This Is Built For
These projects are aimed at someone preparing for a first Vulnerability Management Analyst, Junior Security Analyst, Security Analyst I or entry-level vulnerability remediation role.
These projects sit on the security engineer roadmap and the SOC analyst roadmap, and they cover ground the CompTIA CySA+ guide describes.
No previous vulnerability management experience is expected. Basic networking and cybersecurity knowledge will help, though. You should already be comfortable with terms such as IP address, port, service, patch, authentication and vulnerability.
You will not exploit the target as part of the exercises.
The scanner will identify conditions that an attacker could potentially abuse. Your role is to determine what the evidence supports, how much the finding matters in context and what should happen next. That keeps the work centered on vulnerability management rather than turning the lab into a penetration test.
What the Three Projects Are Designed to Show
The projects were selected around a few practical constraints.
| Requirement | Why it matters |
|---|---|
| Junior-role relevance | The work should resemble tasks seen in entry-level vulnerability management and security analyst roles. |
| Free tools | You should not need an enterprise scanner license to build an entry-level portfolio. |
| Repeatable findings | The target should reliably contain enough real vulnerabilities to support the exercises. |
| Portfolio evidence | Each project should produce screenshots, analysis and decisions worth documenting. |
| Reasonable setup | Setting up the lab should not become harder than the projects themselves. |
The setup matters, especially where network isolation is concerned, but it is not the evidence you are trying to produce.
The useful part begins when the scan results require a decision.
The Three Projects
| # | Project | What You'll Practice | Proof You'll Produce |
|---|---|---|---|
| 1 | Scan and Investigate a Vulnerability | OpenVAS, scanner findings, CVE, CVSS, QoD, authoritative research | Scan evidence, vulnerability analysis, recommended action |
| 2 | Contextualize and Prioritize Vulnerabilities | Risk-based prioritization, CISA KEV, exposure, business context, MITRE ATT&CK | Prioritization table, ATT&CK context, remediation rationale |
| 3 | Remediate or Mitigate a Vulnerability | Remediation planning, mitigation, validation, rescanning, residual risk | Before/after evidence, rescan result, closure decision |
Each project removes a little more structure.
Project 1 gives you a finding and teaches you how to read it.
Project 2 gives you several findings and enough business context to make a priority call.
Project 3 gives you the scan results and leaves the vulnerability, response and closure decision to you.
Vulnerability Management Lab Setup
The lab only needs two virtual machines.
OpenVAS Free provides the scanner and analyst interface.
Metasploitable 2 provides a deliberately vulnerable Linux system with enough exposed services, weak configurations and old software to generate a useful vulnerability queue.
Metasploitable 2 is old on purpose. It contains outdated software, weak credentials, insecure services and other conditions that give security tools something predictable to find.
The vulnerabilities are historical.
The workflow you are practicing is current.
What You Need
- VMware Workstation or VirtualBox
- OpenVAS Free
- Metasploitable 2
Greenbone currently distributes OpenVAS Free as a virtual appliance rather than asking you to build the scanner from scratch.
Greenbone hands the appliance out on request: its page asks you to fill in a short contact form before the download.
Rapid7 provides Metasploitable 2 as a ready-made vulnerable VM.
Metasploitable 2 setup information
If you already use VMware or VirtualBox, stick with the one you know. The project is vulnerability management, not virtualization.
Isolate the Vulnerable VM
This part matters.
Do not put Metasploitable 2 on a bridged network.
Metasploitable 2 is intentionally insecure. The target should only be reachable inside the virtual lab.
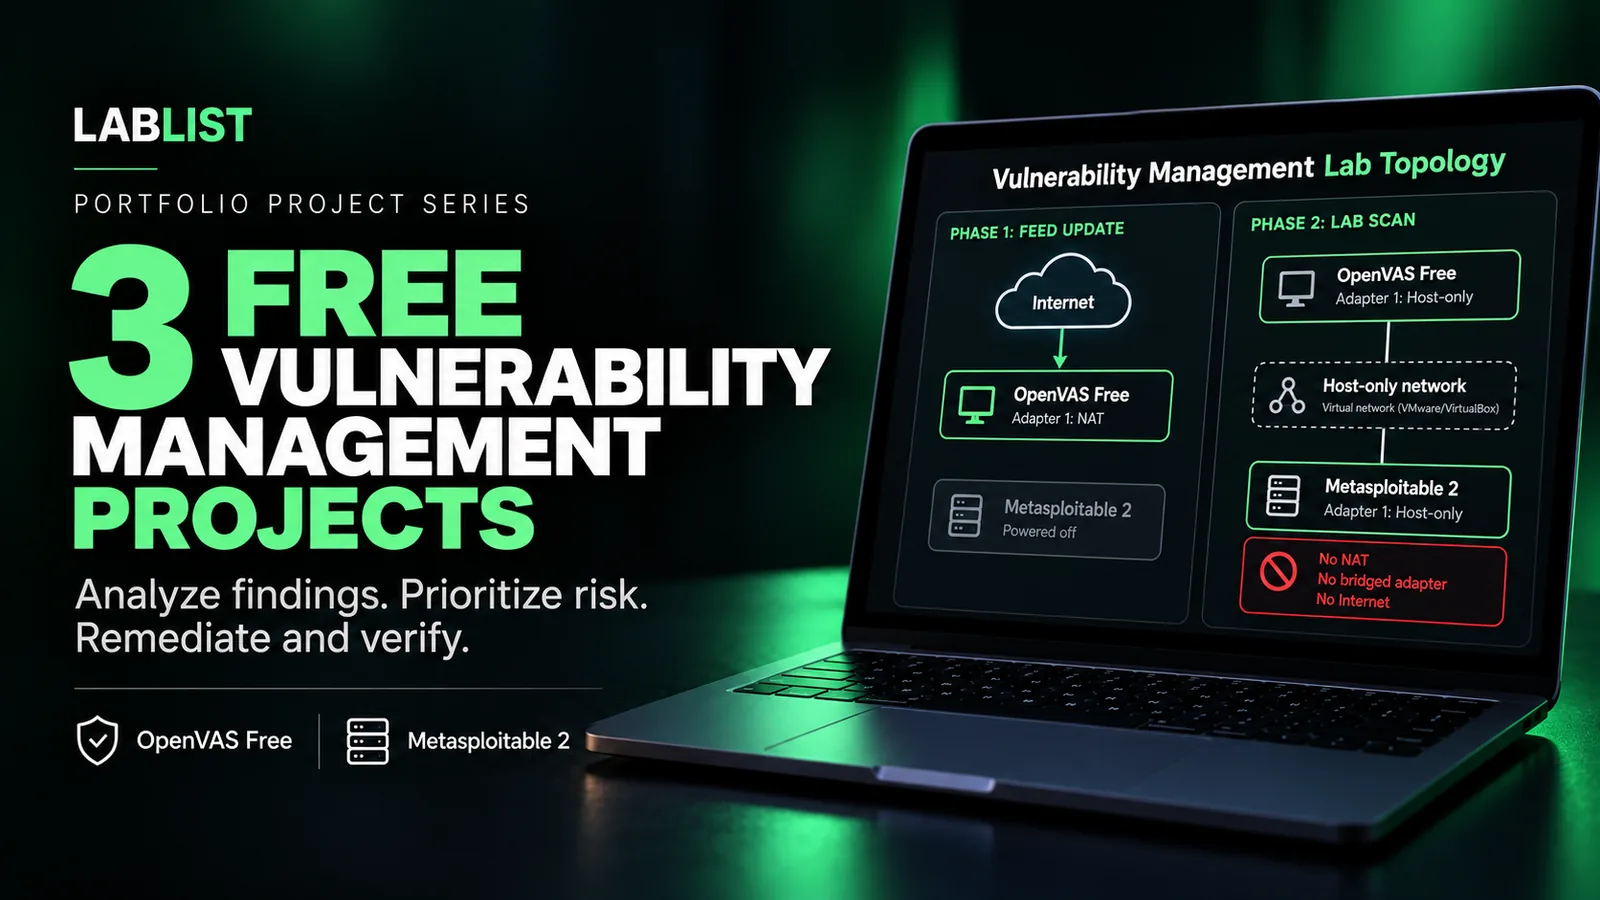
OpenVAS Free needs Internet access while its Community Feed is being synchronized, but the target does not. To keep the network behavior simple and predictable, use the scanner in two stages.
Phase 1: Update the Scanner
The appliance ships with a bridged adapter by default, so check this setting before the first boot. If it shows any other network adapter, disable it too.
Set OpenVAS Free Adapter 1 to Network Address Translation (NAT).
Leave Metasploitable 2 powered off.
Boot OpenVAS Free, complete the first setup and let the Community Feed synchronize.
When the feed is ready, shut the appliance down using Maintenance, then Power.
Greenbone recommends using that menu rather than abruptly powering off the VM because an interrupted shutdown can interfere with system processes such as feed updates.
Phase 2: Build the Isolated Lab
With OpenVAS Free powered off, change Adapter 1 from NAT to Host-only.
If the appliance shows any other network adapter, disable it too.
Configure Metasploitable 2 with one Host-only adapter on the same virtual network.
Disable any additional network adapters on Metasploitable 2.
VirtualBox and VMware both provide Host-only networking for private VM-to-host/VM communication without placing the guest directly on the physical LAN.
For later feed updates, reverse the process: power off Metasploitable 2, shut OpenVAS Free down, move its adapter back to NAT, update the feed, then return the scanner to Host-only before bringing the target back online.
The target should never need Internet access for these projects.
Import the VMs
Import OpenVAS Free using Greenbone's current appliance instructions.
During the first-run setup, create the web administrator and allow the vulnerability feed to synchronize. With no enterprise subscription key installed, the appliance pulls its vulnerability tests from Greenbone's public OpenVAS Community Feed.
Feed synchronization matters because the scanner's vulnerability tests and security information come from that feed. Before treating a sparse report as evidence about the target, check Administration, then Feed Status and make sure synchronization is no longer in progress.
The web interface presents a self-signed Transport Layer Security (TLS) certificate, so your browser may warn you about the connection when you first open it. That warning is expected in this lab.
Import Metasploitable 2 separately and attach it only to the host-only lab network.
The imported machine may arrive with a NAT adapter already attached. Remove or disable it before the first boot, so that the only adapter it has is the Host-only one.
The default Metasploitable login is documented by Rapid7 as:
username: msfadmin
password: msfadmin
Log in and run:
ifconfigRecord the IP address assigned to the host-only interface.
That is the address OpenVAS will scan.
Verify the Lab Network
Before continuing, confirm that both VMs are attached to the same Host-only network and that Metasploitable 2 has no other enabled adapter.
Log in to Metasploitable 2 again and confirm the Host-only IP address you recorded.
The OpenVAS appliance may receive a different IP after you change it from NAT to Host-only. Greenbone documents the appliance address in the administration menu during login and under About. Use the new address when you reopen the web interface.
Host-only networking still needs IP addressing. VirtualBox provides a built-in DHCP service for host-only networks and enables it by default; VMware Workstation can also use a local DHCP service on its host-only network. If either VM starts without a Host-only address, verify that DHCP is enabled for the selected Host-only network before changing guest settings. Advanced users can instead assign static addresses in the same isolated subnet.
VirtualBox host-only networking
From the scanner side, confirm that the Metasploitable IP is reachable.
The hypervisor configuration is the important isolation control. A failed Internet connectivity test from the target can be useful confirmation, but it should not replace checking the VM's adapter settings.
Once the network looks right, take a clean snapshot of Metasploitable 2.
That snapshot gives you a clean way back before Project 3 changes the target.
Project 1: Run a Vulnerability Scan and Investigate One Finding
Your first scan will probably return more findings than you can reasonably investigate at once.
That is normal.
A vulnerability analyst rarely starts by treating every result as an equal problem. The first job is to understand what the scanner is claiming and whether the supporting evidence makes sense.
This project keeps that workload narrow by assigning one finding for a deeper review.
The Workflow
You will work through the path shown below, using one assigned finding so you can concentrate on the process instead of choosing from dozens of results.
- SCANFull and fast task
- FINDINGone assigned result
- CVEthe public identifier
- CVSStechnical severity
- QoDdetection confidence
- RESEARCHNVD and CISA KEV
- ASSESSyour written decision
Run the Baseline Scan
In OpenVAS, create a target using the Metasploitable 2 IP address.
Create a scan task for that target using Greenbone's Full and fast scan configuration.
Run the scan.
If OpenVAS reports that the target is not alive even though both VMs are on the same Host-only network and the IP is correct, check the target's Alive Test. Greenbone uses Internet Control Message Protocol (ICMP) ping by default and also provides other service-ping methods and a Consider Hosts as Alive option for environments where discovery checks cause problems.
Do not be surprised if the report is ugly.
Metasploitable 2 was designed to be vulnerable. A current Greenbone scan can identify old software, remote-code-execution conditions, weak credentials, insecure services, end-of-life components and configuration problems on the same host.
That is useful here because a real vulnerability queue is rarely one neat red box.
When the scan finishes, look at the results before opening any individual finding.
Notice:
- severity;
- affected port or service;
- finding name;
- Quality of Detection;
- CVE references where present.
You are not trying to fix anything yet.
First, learn how the scanner describes the problem.
CVE: The Vulnerability Identifier
A Common Vulnerabilities and Exposures (CVE) identifier gives a publicly disclosed vulnerability a standard name.
For example:
CVE-2011-2523
That identifier lets a scanner, vendor advisory, the National Vulnerability Database and other security systems refer to the same vulnerability.
The CVE number is an identifier.
It is not the severity score, proof that your asset is vulnerable or a remediation decision.
CVSS: Technical Severity
The Common Vulnerability Scoring System (CVSS) is a standardized way to describe vulnerability severity.
A score near 10 generally describes a technically severe vulnerability.
That is useful.
It still does not tell you how important the finding is to your organization.
An internal test server and an Internet-facing payment system could have the same CVE and the same base score while creating very different operational risk.
FIRST currently maintains CVSS version 4.0. You may still see CVSS 3.x scores in scanners and older vulnerability records, especially for older CVEs.
There is no need to recalculate the score here.
Record what the scanner and authoritative vulnerability record report, then concentrate on what the score describes and what it does not.
QoD: How Confident Is the Detection?
Greenbone also reports Quality of Detection (QoD).
QoD is not another severity score.
It describes the reliability of the method used to detect the condition.
A high-severity vulnerability can have weaker detection evidence.
A lower-severity issue can have very strong detection evidence.
That is why analysts should read more than the red number beside a finding.
- Title
- What the scanner calls the condition. Feed wording changes over time, so find a result by CVE, service and port rather than by one exact title.
- Example: the vsftpd result on port 21
- Severity and CVSS
- The CVSS base score the scanner reports. Technical severity only; not priority.
- Example: a score near 10
- QoD
- Quality of Detection: how reliable the detection method is, shown as a percentage. Not a second severity score. Greenbone's documented default view hides low-QoD results, so check the QoD filter before calling a report sparse.
- Example: a percentage beside the finding
- Host
- The scanned address.
- Example: the Metasploitable 2 Host-only address
- Location
- The port and protocol the condition was observed on.
- Example: 21/tcp
- EPSS
- An exploit-likelihood score the feed may attach to a CVE. Not every result carries one; record it when present.
- Example: shown beside the CVE when available
- Solution type
- How Greenbone classifies the response, for example Vendor fix, Workaround or Mitigation.
- Example: Vendor fix
- References
- CVE identifiers and advisory links to check against NVD and the vendor.
- Example: CVE-2011-2523 and its NVD record
Follow One Finding Through the Evidence
Start by looking for the result associated with:
vsftpd 2.3.4 / CVE-2011-2523
Greenbone feed content and finding titles change over time, so do not depend on one exact title. Search by the CVE where available, then by vsftpd, File Transfer Protocol (FTP) on port 21 and the scanner's description of the compromised or backdoored build.
Rapid7's Metasploitable 2 Exploitability Guide confirms that this intentionally vulnerable target runs the backdoored vsftpd 2.3.4 service. The exercise does not require you to trigger it.
If your current Community Feed does not produce a dedicated vsftpd vulnerability result, choose another CVE-backed network-service finding from your report and use the same analysis workflow below. The skill being practiced is the investigation, not matching a screenshot from this article.
Open the selected finding and record:
- affected port;
- severity;
- CVSS information;
- QoD;
- CVE;
- scanner detection details;
- recommended solution or mitigation.
Do not trigger the backdoor.
You do not need a shell to determine what the scanner is telling you.
Check the Finding Against Authoritative Sources
Start with the National Vulnerability Database.
NVD describes a compromised vsftpd 2.3.4 distribution package that can open a shell on TCP port 6200.
Compare that description with what OpenVAS reported.
Ask:
- Does the CVE apply to every version of vsftpd or a specific compromised distribution?
- What version did the scanner identify?
- What evidence did OpenVAS use?
- What CVSS score is reported?
- What does the scanner recommend?
- Is the CVE currently listed in CISA's Known Exploited Vulnerabilities catalog?
CISA Known Exploited Vulnerabilities Catalog
If a CVE is not in KEV, record that honestly.
Not listed in KEV does not mean safe.
KEV is CISA's catalog of vulnerabilities known to have been exploited in the wild. It is not a list of every dangerous vulnerability ever published.
Turn the Research Into an Analyst Assessment
Now stop collecting facts and make a decision.
Your analysis should answer:
- What did OpenVAS detect?
- What does the CVE describe?
- Does the evidence support treating the finding as credible in this lab?
- What should happen next on a real managed system?
For a production system, the answer might be patching, replacing a compromised build, removing an unnecessary service or isolating the system while remediation is planned.
You are not being asked to implement that response yet.
That comes later.
Evidence Worth Keeping
Build a small vulnerability analysis table.
| Field | Your finding |
|---|---|
| Asset | |
| Finding | |
| Service / port | |
| CVE | |
| CVSS | |
| QoD | |
| Scanner evidence | |
| Affected versions / conditions | |
| KEV status | |
| Analyst assessment | |
| Recommended next action |
Useful screenshots include:
- the completed scan summary;
- the selected OpenVAS finding;
- the CVE reference in NVD;
- the relevant evidence or detection detail;
- your final analysis table.
Do not fill your portfolio with every red result from the scanner.
One well-explained finding says more than twenty screenshots with no analysis.
Skills you can document: vulnerability scanning, OpenVAS, CVE research, CVSS, QoD, vulnerability validation, NVD, CISA KEV, security analysis.
Project 2: Contextualize and Prioritize the Vulnerability Queue
Project 1 stayed close to the scanner.
Now add the information the scanner does not have.
A severity score cannot tell you whether a service is Internet-facing, whether the affected system holds sensitive data, whether network controls limit exposure or whether exploitation is already occurring in the wild.
Those details are where prioritization starts to become an analyst task instead of a sorting exercise.
- Scanner severity
- CVSS score
- technical vulnerability characteristics
- standardized scoring
- vulnerability-centric
- Analyst priority
- exploitation evidence
- exposure
- business importance
- compensating controls
- remediation urgency
Severity Is Not Priority
CVSS is useful because it gives analysts a standardized description of technical severity.
It should not become a sorting algorithm for your entire vulnerability program.
For this project, you will look at three different findings and combine the inputs shown below.
- SEVERITY
- EXPLOITATIONKEV / credible threat evidence
- EXPOSURE
- BUSINESS IMPACT
- CONTROLS
- PRIORITY
Then you will decide what should be addressed first.
Use KEV as Threat Context
You already checked CISA's Known Exploited Vulnerabilities (KEV) catalog in Project 1.
Now it becomes part of the decision.
If a vulnerability appears in KEV, there is evidence that adversaries have exploited it in the wild.
That does not automatically make it Priority 1 in every organization.
It is a strong signal that deserves attention.
You may find that none of the CVE-backed findings in this exercise are currently in KEV. That is still a useful result. Record listed, not listed or not applicable rather than treating KEV as a field that must always return yes.
Use MITRE ATT&CK Carefully
The MITRE ATT&CK framework describes adversary behavior.
A CVE is a vulnerability identifier.
An ATT&CK technique describes something an adversary does.
Those are different concepts.
For example, an attacker exploiting a weakness in an Internet-facing application could fit:
T1190 - Exploit Public-Facing Application
An attacker already inside a network who exploits a vulnerable internal network service could fit:
T1210 - Exploitation of Remote Services
An attacker who signs in using unchanged default credentials could fit:
T1078.001 - Valid Accounts: Default Accounts
The important question is not:
Which ATT&CK number belongs to this CVE?
The useful question is:
If an attacker abused this condition in the supplied environment, what behavior would that represent?
MITRE ATT&CK Enterprise techniques
The Scenario
Your lab contains one intentionally vulnerable host.
Real vulnerability queues contain findings from many systems.
For this project, use three technical findings from your Metasploitable scan as stand-ins for the following production situations. The vulnerability information comes from OpenVAS. The exposure and business details below are supplied context.
How to Use the Scenario
The technical evidence comes from your isolated Metasploitable 2 scan.
The asset names, exposure and business details below are simulated production context. They let you practice the part a scanner cannot supply on its own.
Do not edit your screenshots to make Metasploitable 2 look like these production hosts. In your portfolio, describe this section as a prioritization simulation based on technical findings from the lab.
Finding A: vsftpd 2.3.4 / CVE-2011-2523
Use the vsftpd finding you already investigated in Project 1.
Production context:
- Asset:
FILE-XFER-01 - Function: legacy vendor file-transfer service
- Business criticality: medium
- Exposure: Internet-facing
- Data: inbound and outbound supplier files
- Compensating controls: management access is restricted, but the FTP service itself remains publicly reachable
- Threat context: successful exploitation of an Internet-facing service can be considered in the context of T1190 - Exploit Public-Facing Application
Finding B: distccd / CVE-2004-2687
Look for the result associated with the distccd service on port 3632 or CVE-2004-2687.
Rapid7's Exploitability Guide describes this service on Metasploitable 2 and how its network-access design can be abused to run attacker-controlled commands.
Production context:
- Asset:
BUILD-02 - Function: internal legacy build worker
- Business criticality: high
- Exposure: engineering network only
- Data: proprietary source code and build artifacts
- Compensating controls: segmentation limits access to corporate engineering subnets
- Threat context: an adversary already inside the network exploiting a remote service for access or movement can fit T1210 - Exploitation of Remote Services
Finding C: PostgreSQL Default Credentials
Look for the OpenVAS result related to weak or default PostgreSQL credentials.
Rapid7's Metasploitable 2 Exploitability Guide lists this default login for the PostgreSQL service:
postgres:postgresProduction context:
- Asset:
DB-01 - Function: application database
- Business criticality: high
- Exposure: application subnet only
- Data: customer contact and billing records
- Compensating controls: network access is restricted, but the preset database credential has not been changed
- Threat context: abuse of preset credentials can fit T1078.001 - Valid Accounts: Default Accounts
The current Greenbone feed may word these findings differently or may not return every one as a dedicated result.
Match the technical condition, CVE, service and port rather than relying on an exact title. If one is absent from your report, record that difference and use the supplied condition as the case data for the prioritization exercise.
Work the Queue
For each finding, record:
- scanner severity and CVSS;
- CVE, if one exists;
- KEV status;
- current exposure;
- business importance;
- likely impact of successful exploitation or abuse;
- relevant ATT&CK technique, if the mapping is defensible;
- existing controls;
- recommended remediation priority;
- recommended next action.
Then rank the three findings from highest to lowest priority.
If a field does not apply, record N/A rather than inventing a value. For example, a default-credential or configuration finding may not have a CVE or CVSS score of its own.
Do not simply copy the scanner's severity order.
What Should Influence Your Decision?
A few questions are especially useful.
Can an attacker reach it?
An Internet-facing vulnerable service creates a different exposure than a service restricted to a small internal subnet.
Is exploitation known?
KEV status and other credible exploitation evidence can increase urgency.
What happens if exploitation succeeds?
Remote code execution on a public-facing system can be very different from information disclosure on a low-value internal asset.
What does the system do?
Business importance matters.
A database containing billing records may deserve urgent attention even when the vulnerable service is not exposed directly to the Internet.
Are compensating controls actually relevant?
A firewall rule that prevents untrusted systems from reaching a vulnerable service can reduce exposure.
A control that protects a different protocol may not.
Be specific.
Build the Prioritization Table
| Finding | CVSS | KEV / exploit evidence | Exposure | Business context | ATT&CK context | Priority | Recommended action | Rationale |
|---|---|---|---|---|---|---|---|---|
| vsftpd 2.3.4 | ||||||||
| distccd | ||||||||
| PostgreSQL default credentials |
You do not need to force an ATT&CK mapping when the evidence does not support one.
No defensible specific mapping is better than choosing a technique because its name sounds close.
Evidence Worth Keeping
A good portfolio entry should show the decision, not just the source material.
Useful evidence includes:
- the three OpenVAS findings;
- CVE and KEV research;
- relevant ATT&CK pages;
- the completed prioritization table;
- a short explanation of why your highest-priority finding comes first;
- one example where scanner severity alone did not tell the whole story.
If your ranking differs from someone else's, that is not automatically a problem.
The question is whether your decision is consistent with the evidence and the supplied business context.
Skills you can document: vulnerability prioritization, CVSS, CISA KEV, exploitability research, MITRE ATT&CK, risk analysis, asset context, remediation planning, vulnerability management.
Project 3: Take One Vulnerability Through Remediation and Rescan
By this point, you have already read individual findings and made prioritization decisions.
The capstone removes the assigned answer.
Return to your scan results, choose one vulnerability that you can safely address in the lab and take it through the rest of the vulnerability-management lifecycle.
Capstone Objective
Select one confirmed vulnerability from your OpenVAS report.
Determine an appropriate remediation or mitigation, implement it, verify the result and decide whether the finding can be closed.
A note before you start: this capstone does not involve connecting Metasploitable 2 to the Internet for updates. You will work with findings you can fix or mitigate on the machine itself. The section on choosing a finding explains why.
You are responsible for choosing:
- the finding;
- the response;
- the evidence;
- the validation method;
- the final disposition.
The important part is that the choice, response and closure decision are yours.
- SELECT
- RESEARCH
- CHANGE
- VERIFY
- RESCAN
- DISPOSITION
Remediation and Mitigation Are Not the Same Thing
Remediation corrects the vulnerable condition itself.
Examples include:
- installing a fixed version;
- changing an insecure configuration;
- replacing weak/default credentials;
- disabling and removing an unnecessary vulnerable service.
Mitigation reduces likelihood or impact without necessarily removing the underlying weakness.
Examples include:
- restricting network access;
- isolating the service;
- applying a compensating control;
- reducing who can reach the affected system.
Both can be legitimate vulnerability-management actions.
They are not interchangeable.
If you mitigate instead of fully remediating, document what risk remains.
Greenbone's report data draws the same line. Its solution types include Vendor fix, Workaround and Mitigation, and its Mitigation type means what it means above: the risk goes down while the flaw itself stays in place.
Select a Finding You Can Actually Validate
Metasploitable 2 contains intentionally old software, and many of its findings will recommend a vendor update.
On a real production system, patching would usually be the right answer. That is what the solution types in your report are pointing at.
This lab is different. The target must never leave the Host-only network, and fetching an update would mean connecting a deliberately backdoored machine to the Internet, even if only for a minute. Its software is also old enough that the update may no longer exist.
So for this capstone, do not patch. Pick a finding from one of these four categories instead:
- an unnecessary service you can disable;
- a weak or default credential you can change;
- an insecure configuration you can correct;
- exposure you can restrict.
All four are changes you make on the machine itself. None of them needs a download, and each one can be verified with a rescan over the same Host-only network you have been using.
If you are unsure where to start, disable an unnecessary service. It is the simplest change to make, the easiest to verify and the easiest to undo from your snapshot.
If the finding you care about most can only be fixed by a vendor update, you can still use it: write down the update you would recommend, explain how it would resolve the condition, and record the disposition as Remain Open. That is a legitimate outcome, and it is what an analyst does when the fix is outside their control.
Avoid choosing operating system end of life for this capstone unless you intentionally want the project to become a full system-rebuild exercise.
That is a real vulnerability-management concern, but it is much larger than this beginner capstone.
Preserve a Known-Good Starting Point
Before changing the target, take another snapshot.
Name it something obvious such as:
Before-Project-3-Remediation
That gives you a repeatable baseline and lets you recover if the change breaks the intentionally fragile target.
Establish the Before State
Before making the change, save evidence of:
- the OpenVAS finding;
- severity;
- affected service or port;
- CVE or weakness reference;
- current scanner detection;
- current system state relevant to the finding.
Write down why you selected this vulnerability.
That matters.
A good answer is not:
It was red.
A better answer might be:
The service is unnecessary, remotely reachable in the lab and associated with a high-impact vulnerability. Disabling it removes the exposed attack surface without affecting the function I chose to preserve.
Decide What the Response Should Accomplish
Use the scanner's solution information as a starting point.
Then verify the proposed response against an authoritative source when possible.
You should be able to explain:
- what you plan to change;
- why that change addresses the finding;
- whether it removes or only reduces the risk;
- what functionality could be affected;
- how you will know the change worked.
Do not change five things at once.
One controlled change is easier to validate than a pile of unrelated hardening.
That verification step is part of real patch-management work. NIST SP 800-40 Rev. 4 includes verifying the installation of patches, updates and upgrades in its definition of enterprise patch management.
Make One Controlled Change
Make the remediation or mitigation.
Keep notes.
You do not need a cinematic terminal screenshot for every command.
Capture enough evidence to show what changed.
Check That You Did Not Break the Required Function
Security changes can break systems.
Before declaring success, decide what should still work.
If you disabled an unnecessary service, verify that the services you intended to keep still run.
If you changed credentials, verify that the legitimate account can still authenticate using the new credential.
If you restricted access, verify that allowed traffic still behaves as intended.
The exact check depends on the vulnerability you chose.
Rescan and Compare
Run the same scan task against the same target again.
Do not update the scanner's feed between the first scan and the rescan. New feed content can change results on its own, and you would not know whether a difference came from your change or from the feed.
Compare the new result with the original report.
Greenbone can represent differences between reports with states such as:
- Gone
- New
- Same
- Changed
A finding marked Gone is useful evidence.
It is not automatically proof that the underlying software was patched.
For example, a network control might prevent the scanner from reaching the service. That could be a valid mitigation, but the vulnerable software may still exist.
Also check that the findings you did not touch still read Same. If many unrelated results have changed or disappeared, something other than your change is at work.
Describe what actually changed.
Before
- the selected finding
- its original severity
- the affected service and port
- the detection evidence
Change
- the remediation or mitigation performed
- the expected effect
- the function that must keep working
Rescan
- the post-change scanner observation
- the Greenbone delta state where available: Gone, New, Same or Changed
Disposition
- close
- remain open
- mitigated with residual risk
Gone does not automatically mean patched: a control can remove the scanner's path to a condition while the vulnerable software remains. Your own real before and after screenshots are the portfolio evidence.
Decide Whether the Finding Can Be Closed
Your final disposition should be one of:
Close
The vulnerable condition was remediated or sufficiently addressed, verification succeeded and the finding no longer requires active remediation tracking.
Remain Open
The response did not correct or adequately reduce the exposure.
Mitigated With Residual Risk
The underlying vulnerability remains, but a control materially reduces the current exposure.
If you choose this outcome, explain what remains vulnerable and what future action should still occur.
- Close
- the vulnerable condition was addressed
- validation succeeded
- no active remediation remains
- Remain open
- the change failed, was incomplete or was insufficient
- further remediation is required
- Mitigated with residual risk
- exposure materially reduced
- the underlying weakness or some risk remains
- follow-up still required
Build the Remediation Record
| Field | Your finding |
|---|---|
| Asset | |
| Selected finding | |
| CVE / issue | |
| Original severity | |
| Original exposure | |
| Why this finding was selected | |
| Planned response | |
| Remediation or mitigation | |
| Change performed | |
| Functional validation | |
| Rescan result | |
| Residual risk | |
| Final disposition | |
| Follow-up |
Evidence Worth Keeping
This project should produce your strongest portfolio evidence of the three.
Include:
- the original finding;
- your remediation or mitigation rationale;
- evidence of the change;
- post-change scan evidence;
- before/after comparison;
- residual-risk assessment;
- final closure decision.
Do not write:
Fixed vulnerability.
Explain what you changed and how you proved it.
Skills you can document: vulnerability remediation, vulnerability mitigation, OpenVAS, rescan validation, residual risk, change verification, security documentation, vulnerability lifecycle management.
Presenting the Work in a Portfolio
The screenshots establish that you used the tools.
The analysis is what shows what you can do with them.
You can document these as three separate LabList projects or combine them into one larger vulnerability-management lab.
If you also completed the SOC analyst projects, the two sets document complementary skills: detection there, vulnerability decisions here.
Project 1: Vulnerability Scan and Analysis
Show:
- baseline scan;
- selected finding;
- CVE/CVSS research;
- QoD;
- analyst assessment;
- recommended next action.
A concise project summary could explain that you used OpenVAS to identify and research a vulnerability, compared scanner evidence against authoritative sources and documented a recommended response.
Project 2: Vulnerability Risk and Exposure Prioritization
Show:
- selected findings;
- KEV/exploitation research;
- supplied asset and exposure context;
- ATT&CK mappings where appropriate;
- prioritized remediation order;
- rationale.
The strongest part of this project is explaining why your priority order is more useful than sorting the scanner by severity.
Project 3: Vulnerability Remediation and Verification
Show:
- original finding;
- selected remediation or mitigation;
- implementation evidence;
- rescan;
- before/after comparison;
- residual-risk assessment;
- final disposition.
This is the capstone because it demonstrates the complete decision cycle rather than a single tool function.
Keep Your Evidence Clean
Before publishing screenshots, look for information you did not intend to share.
Use generic lab names.
Do not include credentials.
Do not expose unrelated browser tabs, personal usernames, API tokens or information from your everyday network.
The private host-only addresses used in a lab are not the same as publishing a real public-facing company asset, but clean screenshots still make the work easier to understand.
What You Should Be Able to Explain Afterwards
By the end, the scanner should be the least interesting part of the story.
You should be able to explain:
- how a vulnerability scan becomes a finding;
- what CVE and CVSS tell you;
- what QoD tells you;
- why KEV matters;
- why technical severity and remediation priority are not the same thing;
- how ATT&CK can add attacker-behavior context without becoming a CVE lookup table;
- the difference between remediation and mitigation;
- how to verify whether a change actually reduced exposure;
- why a finding should be closed, left open or documented with residual risk.
Those are the parts worth being able to explain in an interview.
They show the difference between generating a report and working a vulnerability through the decisions that follow.
Official References
Sources verified on 10 October 2026.
- OpenVAS Free
- Greenbone documentation
- Rapid7 Metasploitable 2 documentation
- Rapid7 Metasploitable 2 Exploitability Guide
- CVE Program
- National Vulnerability Database
- FIRST CVSS
- CISA Known Exploited Vulnerabilities Catalog
- MITRE ATT&CK
- NIST SP 800-40 Rev. 4
- CVE-2004-2687
Show the work behind the result
Finished one of the projects? Document it while the details are fresh: the finding you chose, the evidence you kept, the decision you made and the screenshots that support it.
A LabList portfolio is built for exactly that kind of evidence, so an employer can see the work itself and not just a list of skills.